Hello There,
Have you ever tried developing code and running it over the tomcat being an Administrator of Middleware Technologies, if not you should do it once to learn how things work at very low level, this posting is for start-up Administrators, who would like to learn how the application coding is done, how the applications are deployed and how application servers take the charge.!!
Tomcat as by itself an application server, contains the Web Container and the EJB Container, which host the JSP, Servlets and EJB Specific Applications.
Here at first place we will configure the Tomcat Application Server with Eclipse IDE and will develop a sample application in Eclipse in deploy it over the Tomcat.
Configuring Tomcat With Eclipse.
============================
Note : As a pre-requisite, you need to have tomcat installed in your local machine ( I am considering it as Windows here)
1) Open Eclipse IDE (Download the Eclipse from this Link)


9) Create web.xml page for accessing these pages - Right Click on WebContent -> New -> File -- File Name : web.xml

Once created; copy the below contents to the file and Save it.
<?xml version="1.0" encoding="UTF-8"?>
<web-app id="WebApp_ID" version="2.4"
xmlns="http://java.sun.com/xml/ns/j2ee"
xmlns:xsi="http://www.w3.org/2001/XMLSchema-instance"
xsi:schemaLocation="http://java.sun.com/xml/ns/j2ee
http://java.sun.com/xml/ns/j2ee/web-app_2_4.xsd">
<servlet>
<servlet-name>Hello</servlet-name>
<servlet-class>HelloWorld</servlet-class>
</servlet>
<servlet-mapping>
<servlet-name>Hello</servlet-name>
<url-pattern>/HelloServlet</url-pattern>
</servlet-mapping>
</web-app>
10) Now you have to test and Run the Application - As we have already configured the Tomcat Server Engine, go to Platform Runtime Window and Right Click on Tomcat Server Name and Go to Add Remove Project.

11) From Available Projects Add the JSPServletExample Project in the Configured List - Say Finish.
12) Start the Tomcat Server by Right Clicking on it and verify the Tomcat Applications.
13) Try to Access the Page for your Application at
http://localhost:9090/JSPServletExample/ and verify the file HelloWorld.jsp available in the list.
Now Access the below link or Click on the File HelloWorld.jsp
http://localhost:9090/JSPServletExample/HelloWorld.jsp
14) And See the Page :

15) Try to Enter a Color in the Text Box and Hit Submit - Here my fav.. Red Wins...!!

Hope you have enjoyed the tutorial, See you later with a new concept and a tutorial soon..!!
Regards
Shailesh Dyade.
Have you ever tried developing code and running it over the tomcat being an Administrator of Middleware Technologies, if not you should do it once to learn how things work at very low level, this posting is for start-up Administrators, who would like to learn how the application coding is done, how the applications are deployed and how application servers take the charge.!!
Tomcat as by itself an application server, contains the Web Container and the EJB Container, which host the JSP, Servlets and EJB Specific Applications.
Here at first place we will configure the Tomcat Application Server with Eclipse IDE and will develop a sample application in Eclipse in deploy it over the Tomcat.
Configuring Tomcat With Eclipse.
============================
Note : As a pre-requisite, you need to have tomcat installed in your local machine ( I am considering it as Windows here)
1) Open Eclipse IDE (Download the Eclipse from this Link)


2) Go to Java EE Perspective as Shown in the picture above at the Right top corner of the Window.
3) You will see Servers tab at the bottom in Platform Runtime Window (To Understand about the Eclipse you need learn about that first ( I am not so good though..;))
4) Click on new server wizard link.
5) You will see a below window popped up in a flash ( Unless you have Core i5 Processor)

6) As I have installed Tomcat 7.x version, I will select the same, you can select your own from the list.
7) Click On Finish ( If you Click on Next, you will have different option to Add resources to the Server environment)
8) You will see the Eclipse window as below

You have a Tomcat Server Configured in the Platform Runtime Window and There is a new Project got created as "Servers" in Package Explorer Window. If you expand that, it will look like the one below.
You can edit the files and save the files from Eclipse environment from now.
9) Well on other way you have option to start and stop the Tomcat Server from within of Eclipse IDE, Just Right Click on server name and Click Stop/ Start

10) And if you would like to verify you can very well test the page from browser.
http://localhost:9090/ (My Champ (JBoss) is Running on 8080 and asking for the reason to free it up..!!)
There are no files as there are no resources added to the tomcats work directory.
Developing and Deploying Application through Eclipse
==============================================
1) Lets create a Dynamic Web Application in Eclipse.
Go to New -> Dynamic Web Content -> Name Your Application as below - Say Finish

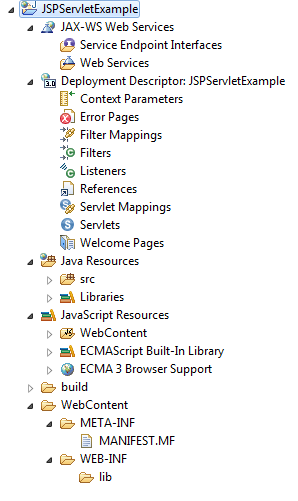
2) You will see the hierarchy of the project as below, its because you have selected the Dynamic Web Content for the project type.
3) Now Create the Web Content - Right Click on WebContent Node -> New -> JSP File

4) After you create this file you will see by default there will be some JSP Specific code will be generated in the file as below.
<%@ page language="java" contentType="text/html; charset=ISO-8859-1"
pageEncoding="ISO-8859-1"%>
<!DOCTYPE html PUBLIC "-//W3C//DTD HTML 4.01 Transitional//EN" "http://www.w3.org/TR/html4/loose.dtd">
<html>
<head>
<meta http-equiv="Content-Type" content="text/html; charset=ISO-8859-1">
<title>Insert title here</title>
</head>
<body>
##### JSP CODE GOES HERE #####
</body>
</html>
You just need to write your JSP Code between the <body></body> tags.
Copy the below code between <body></body> tags as below.
<%@ page language="java" contentType="text/html; charset=ISO-8859-1"
pageEncoding="ISO-8859-1"%>
<!DOCTYPE html PUBLIC "-//W3C//DTD HTML 4.01 Transitional//EN" "http://www.w3.org/TR/html4/loose.dtd">
<html>
<head>
<meta http-equiv="Content-Type" content="text/html; charset=ISO-8859-1">
<title>Hello World</title>
</head>
<body>
<form action="HelloServlet">
Please enter a color <br>
<input type="text" name="color"size="20px">
<input type="submit" value="submit">
</form>
</body>
</html>
Change the title as per your convenience.
5) If you see, its calling needs a servlet to do get and post the values from JSP's Form which we have see in the above code, lets create it.
6) Right Click on Java Resources : src -> New - Servlet as below.

7) Name your class as HelloWorld as below.

8) Place the below code in the file. ( you may need to remove all other extra things which is already generated, or else you can reuse the same for extra coding purpose ;)
import java.io.IOException;
import java.io.PrintWriter;
import javax.servlet.ServletException;
import javax.servlet.http.HttpServlet;
import javax.servlet.http.HttpServletRequest;
import javax.servlet.http.HttpServletResponse;
public class HelloWorld extends HttpServlet {
protected void doGet(HttpServletRequest request,
HttpServletResponse response) throws ServletException, IOException
{
// reading the user input
String color= request.getParameter("color");
PrintWriter out = response.getWriter();
out.println ("<!DOCTYPE html PUBLIC \"-//W3C//DTD HTML 4.01 Transitional//EN\" \"http://www.w3.org/TR/html4/loose.dtd\">\n");
out.println("<html>\n");
out.println("<head> \n");
out.println("<meta http-equiv=\"Content-Type\" content=\"text/html;charset=ISO-8859-1\"> \n");
out.println("<title>Hellow World JSP</title> \n");
out.println("</head> \n");
out.println("<body> \n");
out.println("<font size=\"12px\" color=\"" +color+ "\">"+"Hello World From Shailesh Dyade");
out.println("</font> \n");
out.println("</body> \n");
out.println("</html>");
}
}
Though you can change the code as you wish to develop the application ;)
9) Create web.xml page for accessing these pages - Right Click on WebContent -> New -> File -- File Name : web.xml

Once created; copy the below contents to the file and Save it.
<?xml version="1.0" encoding="UTF-8"?>
<web-app id="WebApp_ID" version="2.4"
xmlns="http://java.sun.com/xml/ns/j2ee"
xmlns:xsi="http://www.w3.org/2001/XMLSchema-instance"
xsi:schemaLocation="http://java.sun.com/xml/ns/j2ee
http://java.sun.com/xml/ns/j2ee/web-app_2_4.xsd">
<servlet>
<servlet-name>Hello</servlet-name>
<servlet-class>HelloWorld</servlet-class>
</servlet>
<servlet-mapping>
<servlet-name>Hello</servlet-name>
<url-pattern>/HelloServlet</url-pattern>
</servlet-mapping>
</web-app>
10) Now you have to test and Run the Application - As we have already configured the Tomcat Server Engine, go to Platform Runtime Window and Right Click on Tomcat Server Name and Go to Add Remove Project.

11) From Available Projects Add the JSPServletExample Project in the Configured List - Say Finish.
12) Start the Tomcat Server by Right Clicking on it and verify the Tomcat Applications.
13) Try to Access the Page for your Application at
http://localhost:9090/JSPServletExample/ and verify the file HelloWorld.jsp available in the list.
Now Access the below link or Click on the File HelloWorld.jsp
http://localhost:9090/JSPServletExample/HelloWorld.jsp
14) And See the Page :

15) Try to Enter a Color in the Text Box and Hit Submit - Here my fav.. Red Wins...!!

Hope you have enjoyed the tutorial, See you later with a new concept and a tutorial soon..!!
Regards
Shailesh Dyade.
No comments:
Post a Comment